If you would like to read the other parts in this article series please go to:
Simple Network Management Protocol (SNMP)
Simple Network Management Protocol (SNMP) is a widely and popular used protocol for network management and monitoring. SNMP used to collect and organize information about managed devices like CPU, RAM, Disks and Network utilization, usage and response time, in addition to collecting diagnostic data for troubleshooting. Devices that typically support SNMP include servers, SAN storage, switches, routers, printers, UPSs ... etc. SNMP could be used also to backup and modify configuration of managed devices.
SNMP is a UDP application layer protocol that depends in its work on two components:
- SNMP Agent: The software component that runs on the managed device and listens on UDP port 161. SNMP agent responds to SNMP manager requests by sending monitoring data in the SNMP Read Only Mode or by modifying the managed device configuration in the SNMP Read and Write Mode.
- SNMP Manager: The software component that used to collect monitoring data from SNMP agents after sending SNMP requests to them or by receiving SNMP traps from SNMP agents on UDP port 162.

Another important component is the Management Information Base (MIB) which is a structure of the management and monitoring data of the managed device that could be offered using SNMP agents. MIB uses a hierarchical namespace containing object identifiers (OID). Each OID identifies a variable that can be read or set via SNMP.
SNMP Versions
| SNMP v1 | SNMP v2c | SNMP v3 |
| 1. Supports 32 bit counters only. |
1. Supports 32 bit and 64 bit counters. |
1. Supports 32 bit and 64 bit counters. |
| 2. Authentication uses a Community String. |
2. Authentication uses a Community String. |
2. Authentication uses a username and a hashed password. |
| 3. SNMP Community String sent over the network in plaintext. |
3. SNMP Community String sent over the network in plaintext. |
3. Supports Hashing and Encryption. |
| 4. Supports IP address Access Lists. |
4. Supports IP address Access Lists. |
4. Supports IP address Access List. |
| 5. Supports two modes Read Only and Read/Write. |
5. Supports two modes Read Only and Read/Write. |
5. Supports two modes Read Only and Read/Write. |
Microsoft Windows supports only SNMP v2c, which means that Microsoft Windows SNMP service authenticated only using a community string which is sent over the network between SNMP Agents and Managers in plaintext. This makes Microsoft Windows SNMP service traffic vulnerable to network eavesdropping attacks.
What is Internet Protocol Security - IPSec (Wikipedia)
Internet Protocol Security (IPsec) is a protocol suite for secure Internet Protocol (IP) communications by authenticating and encrypting each IP packet of a communication session. IPsec includes protocols for establishing mutual authentication between agents at the beginning of the session and negotiation of cryptographic keys to be used during the session. IPsec can be used in protecting data flows between a pair of hosts (host-to-host), between a pair of security gateways (network-to-network), or between a security gateway and a host (network-to-host). Internet Protocol security (IPsec) uses cryptographic security services to protect communications over Internet Protocol (IP) networks. IPsec supports network-level peer authentication, data origin authentication, data integrity, data confidentiality (encryption), and replay protection.
Windows SNMP Security Configuration and Encryption using IPSec
In this section we will learn together:
- How to install Microsoft Windows SNMP service?
- How to configure security settings of Microsoft Windows SNMP service?
- How to use IPSec to protect Microsoft Windows SNMP service against network eavesdropping attacks?
The configuration steps will be using a lab consists of:
- SNMP Agent: MS Windows Server 2012 R2 machine.
- SNMP Manager 1: Windows Based.
- SNMP Manager 2: Linux Based.
Installing Microsoft Windows SNMP service
1. From Windows Server 2012 R2 Server Manager click on Manage menu and select Add Roles and Features.

2. In the Add Roles and Features Wizard first window, make sure that Role-based or feature-based installation option is selected and click Next.

3. In Select destination server windows make sure that you select your local server and click on Next.

4. In Select server roles window, don't select anything as the SNMP service is a feature and not a role. click Next.

5. In Select features window, scroll down and check the SNMP Service feature.

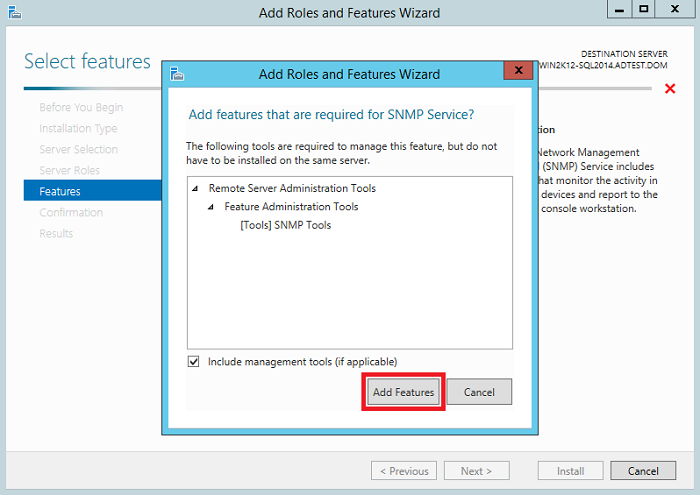
6. In Add features that required for SNMP Service? pop up box click on Add feature then click on Next.
7. In the Confirm installation selections click on Install.


8. In Installation progress window click Close when Installation succeeded.

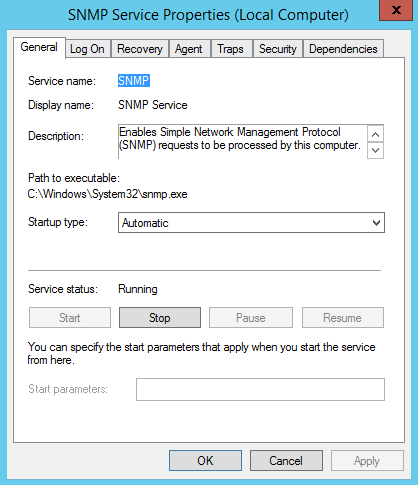
9. From Server Manager click on Tools menu and click on Services then scroll down to SNMP Service and make sure that the service status is Running and Startup Type is Automatic.

At this point Windows SNMP Service installed successfully.
Configuring MS Windows SNMP security settings
1. From Server Manager click on Tools menu and click on Services then scroll down to SNMP Service.
2. Double click on the SNMP Service to open the SNMP Service Properties box and click on Security tab of the SNMP Service Properties box.
3. In the Security tab, make sure that Send authentication trap check box is checked, then click Add... button to add an Accepted community string.

4. From the Community rights drop down list select the desired right (e.g. READ ONLY) and in the Community Name text box type a complex community string and don't even think to use common and default community strings like public, private, cisco ... etc. Then click Add button.

5. In the Security tab, make sure that Accept SNMP packets from these hosts option is selected, then click Add... button to add the IP address of the SNMP Manager that will monitor this Windows Server. This option will create an access list for the allowed IP addresses that Windows server will accept SNMP queries from them only.

6. In the Host name, IP or IPX address text box type the SNMP Manager IP address (e.g. 192.168.56.100), then click Add... button..

7. Click OK button to close the SNMP Service Properties box.

At this point the configuration of the security settings of Windows SNMP Service completed successfully.
No comments:
Post a Comment